| Organic Seeds | Edible Plants | Organic Pest Controls | Books | Tools, Propagation & Fertilisers | Sprouting & Microgreens | Poultry Supplies | Specials & Gift Ideas |

Top

We will send an email to this address*
when is next available
* we will use this email address only for this notification and then we will delete it.
 Home
Home
Green Harvest Organic Gardening Supplies is permanently closed as of 5pm on 1-11-2023.
We will not be taking orders by this website, in person, by phone or email. Our display garden and retail shop are closed forever.
Read more...
Phone:07 54357000
Phone calls will only be responded to sporadically and only in reference to orders placed prior to 2-11-2023. All the useful growing and organic pest management research and resources are available on this website for a while still.
HOW TO RAISE SEEDS SUCCESSFULLY © Frances Michaels
Seed Treatment
Raising plants from seeds can be satisfying and fun. There are hundreds of varieties to choose from, far more than are available as seedlings. If you are growing vegetables this also gives you the chance to go organic from seed to plate, giving you complete control over what you are eating. There are new taste sensations just waiting to be discovered. Don't be afraid to try seed raising, a bit of time and effort spent getting it right will reward you with a good germination rate.
A seed is a miracle of life. It is a tiny plant embryo combined with enough stored energy to bring it to life. The main requirements are moisture, air and warmth. The moisture softens the seed coat and allows the seed to swell. Air or oxygen can then enter and the seed begins respiration (to breathe), a process that releases the stored food energy of the seed and makes it available to the plant embryo. No fertiliser or light is necessary at this early stage for most seeds. The plant embryo has limited food available, it has enough to break through the soil surface, open its leaves and begin photosynthesis. It then immediately needs light and is vulnerable to drying out as it has started to grow. Fungal diseases may attack it, particularly if the soil mix is too wet or heavy. Air is vitally necessary in the root zone for successful germination and it occupies the spaces between soil particles. If the growing medium is too wet all the air spaces are occupied by water instead; if it is too heavy there is little or no air space available.
WHEN TO SOW
 Always begin by reading the seed packet for directions.
A. Growing Season
Timing is very important. Annual seed must germinate, grow and produce before the onset of changed weather conditions. Check the plant has sufficient growing time ahead. Warm season plants such as eggplants, capsicum and rosellas need 4 - 5 months frost free in order to produce. Cool season plants will 'bolt' (i.e. go to seed) in spring due to higher temperatures if sown too late. Information on what to plant now can be found in the seasonal Green Notes. Local sources of information are very useful such as garden clubs or gardening columns.
B. Soil temperature
The soil or seed raising mix temperature needs to be at the correct temperature for the type of seed being sown. If the soil is too cold or too hot the seed may not germinate. Many vegetables, including beans, zucchini, melon, cucumber, tomatoes and capsicum, need a soil temperature of at least 20°C to germinate. Tropical and subtropical plants such as pigeon pea, rosella and winged bean need an even higher temperature to germinate successfully, over 25°C. Seeds such as carrot and lettuce will fail to germinate at high temperatures, over 25°C.
In cooler areas you may need to start seed earlier indoors as otherwise the growing season may simply not be long enough to produce successfully. It is disappointing to have a plant grow, flower and begin to fruit and then be cut down by the first frost of winter. To start seed earlier you will need to use either a bottom heat propagator or a hothouse. If this is not available you can try a warm windowsill, the top of a hot water heater or a Mini Propagator. Don't worry about the lack of light if your source of bottom heat is indoors. Seeds don't need light to germinate; in fact many germinate better in dark conditions (lettuce is the exception). Just keep a close eye on them and move them to a well-lit area as soon as they are germinated. Remember: air temperature is always warmer than soil temperature.
WHERE TO SOW
Deciding whether to sow seed directly into the garden, seedbed or into a container is a choice you need to make.
Direct Sowing
An advantage of direct sowing is it is less hassle; there is no need for transplanting, the plants establish easily with no 'transplant shock' and the seedlings are generally hardier. The disadvantages of direct sowing are that the soil may be too cool for the seed to germinate; the soil needs careful preparation to a fine tilth and this can be hard on your back; the space may still be occupied by an earlier crop; or birds, rats and ants may steal the seed.
- Direct sowing into a seed row in the garden is used for many vegetables; especially large seeds such peas, beans, corn and leafy greens such as rocket or coriander. It is essential for root vegetables that are difficult to transplant, such as carrots. To sow seed in a row use a long piece of bamboo or dowel lightly pressed into the soil. Use a chinagraph pencil to mark measurements along your bamboo pole or dowel, for ease of judging distance between rows and plants. Check the seed packet directions for spacing.
- Seeds of squash, pumpkin or melon are usually planted in 'hills' instead of rows. This involves digging a circle 30 cm across and planting 3-5 seeds. Once germinated thin out to the 2 strongest seedlings.
- Broadcast sowing, where the seed is evenly scattered across the growing area and lightly covered; is used for green manures; covercrops; lawn seed; wildflower meadow mixes and insectary mixes such as Good Bug Mix.
To prepare your soil for direct seeding it is usually necessary to dig the soil over, breaking up lumps with a garden fork. Then rake it to a fine tilth. Do not try to prepare the soil when it is very wet, as you will just damage the soil structure. Organic fertiliser or compost can be spread over the area and forked through as part of the preparation. Lime should be added several weeks apart from any fertiliser.
Seed Sowing in Rows and Seedbeds
As a general rule sow most seeds to twice their thickness (diameter). Fine dust-like seeds are simply pressed into the surface. In cooler conditions it can help to sow the seed less deep than recommended, as it is warmer closer to the surface. If fine seeds like carrots are planted directly into rows in the garden it can help germination to cover the rows with folded shadecloth, cardboard or even an old weatherboard. Remove the cover as soon as the seed germinates. It can improve germination of small seeds planted direct into rows to cover them with sieved material, coconut fibre or seed raising mix rather than just soil.
Mulch in Seed Rows or Seedbeds
Mulch should not cover the seeds, as it will impede germination. It helps, however, to mulch between the rows, as weeds will take over very quickly. Tricks to applying mulch without difficulty include covering seeds in a small area such as zucchini or melon with an upturned pot. Then mulch the area and remove the pot when you are done. This leaves a neat circle of un-mulched ground around your seeds. For running vegetables such as melons, cucumbers and pumpkins you need to mulch heavily as you won't easily be able to mulch the area once the plants start to run. Aim for mulch 10 cm deep. Or for seed in rows, cover the seed row with an old timber weatherboard or long, 8 cm wide strips of strong cardboard, mulch the area and then remove the strips. It helps if the straw or hay mulch is in fairly fine pieces. Add to the mulch along the rows once plants are germinated and over 10 cm high, to at least 8 - 10 cm deep, to prevent weeds germinating. It saves heaps of time to beat the weeds with mulch as trying to weed between young plants is very time consuming but is crucial to a healthy productive plant.
Seedbed
A seedbed is a small area of the garden set aside for seedling production. Pick the sunniest spot with good soil and drainage. Then dig the soil over thoroughly. The advantage of using a seedbed is that you only have to intensively care for a small area. It is possible to cover a small area during hot periods with PestGuard fabric or shadecloth on a frame, for improved germination. In cooler areas try to cover the seedbed at night with clear plastic or glass to keep the heat in and protect seedlings from a late frost. Seeds can be sown in rows in the seedbed much closer together for later transplanting.
Container Sowing
Container sowing should always be used for seeds that are very fine, expensive, slow to germinate or just to get a jump on the season. The advantage to sowing in containers is it gives you greater control and flexibility. The containers can be placed in a warm position allowing you to start seeds earlier in spring. It is possible to control watering and fertilising more accurately. Pests can more easily be monitored; you are far less likely to lose a whole batch of seedlings to a hungry snail. The disadvantage is the time involved in 'pricking out' the seedlings and the need for greater attention to watering. It is also more expensive to buy the trays and seed raising mix. For gardeners with limited space it is possible to grow many vegetables to maturity in containers. Larger containers are useful for this such as recycled styrofoam vegetable boxes or Super Tubes.
Types of Container
- Seedling Trays or Punnets:Seedling trays and punnets are shallow so the seed raising mix stays warm. Shallow seed trays also a have a better surface/depth ratio to improve aeration. Seed can be sown directly into seedling trays or the seedling tray used as a tray to hold punnets, jiffy pots, jiffy starters or 48 cell growing trays. 48 cell growing trays are made of a soft plastic that allows you to squeeze the entire seedling out without damage to the root ball. Seedling trays are designed to fit bottom heat propagators and Mini Propagators. Sowing seed directly into a seedling tray gives you a good surface to work from in order to 'prick out' or just thin your seedlings. Small tree seeds should first be sown in a seedling tray and later transplanted at the 4-6-leaf stage, into individual tree tubes, before planting out into their final position. This is because pots are too deep and stay too cold and wet for good germination. Tree seeds can take 3-6 months to germinate, depending on factors like soil temperature so they should be labelled with the name and date of sowing and left alone in a seed tray. One day when you have forgotten about them there may be a tray with hundreds of seedlings!
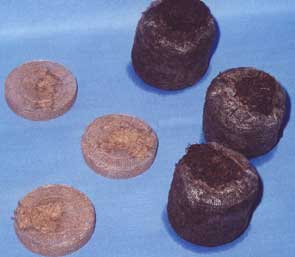
- Plantable Pots: These include Jiffy Coco Pellets and Potmaker pots. These allow you to sow individual seeds in controlled conditions, without the need for pricking out. A big advantage is they reduce transplanting shock as the whole container is planted. The Jiffy Plant Starters are particularly useful for starting tomatoes, capsicums and eggplants. The Jiffy Pots are great for starting larger seeds such as zucchini, corn, melon and cucumber. A Potmaker is used to make your own small pots out of newspaper. Jiffy Pots and handmade Potmaker pots need to be filled with a seed raising mix, while the Jiffy Plant Starters are a container and mix combined.
- Seed Raising Mix: Choose a good quality seed raising mix, a small expense that will pay dividends. Look for brands that meet or exceed the Australian Standard. Seed raising mixes are designed to allow the right aeration for the germinating seed. Seeds need oxygen for respiration or they suffocate and die, which is why seed raising mixes usually have quite a bit of sand/vermiculite/perlite to try and improve aeration. You can make your own but it is better to become an experienced seed raiser before attempting this. Never just use garden soil in a container as it shrinks and makes watering very difficult and lacks aeration. Usually potting mix is too coarse to be used to raise seeds.
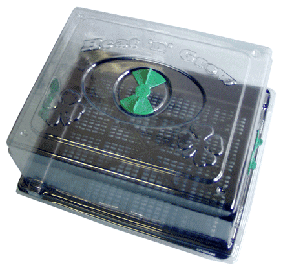
- Preparing the Containers: First fill the seedling tray or punnet right to the surface and firm down, to 1 cm below the rim. A handy tool for firming down can be made from plywood with a handle glued to the back, to fit the punnet or seedling tray. Don't press down too hard; you need to keep air in the mix. Then water the punnet or tray gently until water runs out the bottom. Sow seeds evenly, try to leave space around all seeds. Fine seed can be mixed with dry, clean sand to help spread it evenly. Paying attention to spreading the seed out will save time later and produces a sturdier seedling. It avoids wasting seed. If you are using a Mini Propagator keep the ventilator closed until germination, this allows moisture to condense and be recycled, keeping the soil evenly moist. Heat is retained which speeds germination. Place seed trays in a warm, sheltered position with good light but not direct sun. Remember to label your trays or punnets to avoid later confusion.
- Pricking Out: Seedlings can develop disease, such as damping-off or to grow too tall and spindly, if they are left too close together. Pricking out is done at the 4 - 6 leaf stage, usually 2 - 4 weeks after germination. Select the sturdiest seedlings, discard any that are badly formed, damaged in the pricking out process or with insufficient root development. Seedlings are lifted carefully by their leaves (never the stems), using a dibber to gently loosen the roots and transplanted into punnets, Potmaker pots, recycled yoghurt cups or tree tubes. Certain vegetables like to be re-planted deeper than they originally germinated. These include cabbage, broccoli, cauliflower and tomato. To do this remove the first set of 'juvenile' seed leaves and plant up to the first set of true leaves. Doing this can increase the root area of a plant and hasten fruit development. In general though it is best to replant to the same depth. Once pricked out water gently, and if using a Mini Propagator, open the ventilator to encourage air circulation. At this stage seedlings need continuous moisture and nutrients, which can be provided by half-strength liquid manure or Natrakelp, applied every few days. Remove the propagator lid during the day once the seedlings are growing vigorously and replace it at night. Once roots reach the bottom of the growing container, usually after 2-4 weeks, they will be ready to transplant into their final position.
- Hardening Off: All seedlings need to be toughened up to full sun exposure before transplanting. This is done over a few days by moving the trays or punnets into steadily more exposed sun conditions. Keep a close eye on them so that they don't dry out.
Water gently, with a fine spray, to avoid washing seeds away. Avoid over-watering, as this will cause 'damping off'. Damping off pathogens can attack seeds before they germinate or after seedlings have emerged. Remember that seeds need to breathe in order to grow and there is no room for air if all the available spaces in the soil are constantly filled with water. Seeds vary in their vulnerability to damping off. Water when the surface feels dry, once a day may be too much. Once the green leaves appear it is better to combine watering with weak liquid feeding as seed raising mixes contain very few nutrients.
TRANSPLANTING SEEDLINGS FROM CONTAINERS OR SEEDBEDS
A bit of planning ahead is needed for successful transplanting:
- Give the seedlings a deep soaking the day before preferably in diluted seaweed fertiliser. This will strengthen the seedling and reduce transplant shock. Transplant shock is best avoided; it means the seedling may just sit there for many weeks without making growth or in some cases such as lettuce it may bolt to seed without producing a head.
- The very best time to transplant is on overcast days or even better, in gentle rain.
- Prepare the hole, fill it with water and allow it to drain away before gently planting the seedling.
- Handle the seedling by the leaves if at all possible, if it is necessary to hold it by the stem use a feather light touch. Too hard a grip will crush the channels in the stem needed for the transport of water and nutrients and the seedling will only make poor growth.
- Firm the soil around the seedling gently, never tramp or pack the soil down hard around the seedling as you are damaging the soil structure and reducing the aeration.
- Water the seedling well with a gentle spray as soon as possible after planting.
- If hot weather is expected try to cover the seedlings in the hottest part of the day with shadecloth.
- Put snail and slug protection in place immediately; a lot of seedlings can be lost the first night. Use either a small amount of snail pellets around the seedlings or a circle of copper barrier tape.
Some seeds require specific treatments before sowing. The 2 main types of treatment are scarification and stratification. Scarification is used for seeds with very hard outer coats and involves either hot water or rubbing the seed between two sheets of fine sandpaper. This allows moisture to enter the seed so that it can swell and begin the process of germination. Tree lucerne and winged beans need a treatment like this or germination will be very slow. Some seeds such as peas and beans should be soaked overnight until the seed swells, sown but not watered again until the seedlings are up. Stratification is a cold treatment for plants that evolved in areas with very cold winters. It involves mixing the seed with moist sand and placing it in the fridge for 4-8 weeks before sowing. It is unlikely to be necessary In Australia.
WHY DID MY SEEDS FAIL?
There are many reasons for poor germination of seed, just doing the opposite of all the strategies suggested earlier for starters. When conditions are right and seed is viable, the plants just seem to jump out of the ground.
- If you are trying to 'extend the season' try a few seeds to begin with and keep a written record.
- To germinate seed must be viable, this means capable of germinating. Seed may not be viable because it is poor quality to begin with, if you believe this to be the case you should bring it to your seed suppliers' attention, many will offer you a replacement.
- Seed Storage: Seed can lose its viability if it is stored incorrectly. To store it correctly use a sealed container and keep it in your fridge. Seed stored in a hot garden shed or garage that can reach temperatures greater than 40°C in summer will simply die. Seed stored open to the air where it can take up moisture will lose viability. Seed also loses viability with age. Seed packets are best used within the same year they are purchased. If you plan to use them the following year reseal the packets well before storing.
- Seeds often fail because they rot in the ground, this can happen for several reasons. The soil is kept too wet, therefore there is not enough air and the seed suffocates. The soil temperature is too cold for the particular type of seed. Or the seed is attacking by fungal 'damping off' organisms. There is a range of these that occur naturally, the best way to avoid this problem is to use a good quality seed raising mix.
- If seed fails to germinate always take a look, especially at bigger seeds. Carefully dig up a seed and see if it has rotted. Check that a bird or animal has not eaten the seed. Also look to see if it has germinated and then been eaten by an animal or insect, snail or slug. There may be a row of tiny stems left behind. Sometimes birds will walk along your row and yank the entire young seedling up. If this is the case then you will need to look at better protection for your seeds.
Propagation,
Pots and Trays, and
Tags and Labels.
Home
Green Harvest Organic Gardening Supplies is permanently closed as of 5pm on 1-11-2023.
We will not be taking orders by this website, in person, by phone or email. Our display garden and retail shop are closed forever.
Read more...
Phone:07 54357000
Phone calls will only be responded to sporadically and only in reference to orders placed prior to 2-11-2023. All the useful growing and organic pest management research and resources are available on this website for a while still.
We guarantee our seeds to the value of the purchase price. We are happy to replace the seeds, give you a credit or refund, whichever you prefer. Other than our guarantee to the extent of the purchase price Green Harvest gives no other warranty expressed or implied. No liability will be accepted by Green Harvest, its owners or employees as to the accuracy of any information. No responsibility will be taken for damage to property or persons due to information given about a product or technique. No responsibility will be taken for the loss of a crop or income due to information given about a product or technique.
 Shopping here is private and secure.
Copyright © 2001 - 2024 Green Harvest Organic Gardening Supplies
No part of this website may be reproduced without permission of the owner